

When you review AACD accreditation clinical case common failure reasons, start by separating clinical concerns from gaps in the submission record. Use this checklist to examine case selection, margins, line angles, contours, photographs, and the account of your treatment before packaging the case.
Treat these checks as suggested review prompts. Take official case definitions, evaluation criteria, and submission requirements from the AACD candidate materials applicable to your submission. Reserve statements about examiner penalties or the frequency of particular failures for sources that actually document them.
I’d give every unresolved concern its own note: what you observed, where it appears, and what needs review. Avoid assigning a passing score from this checklist.
Give yourself room to question the case without turning every uncertainty into a treatment decision. Record the concern first, then decide whether it calls for clarification, another photograph, or professional clinical assessment.
Choose a case you can defend against the category
Start your AACD clinical case audit with the category you intend to submit. Set aside the overall appearance briefly and compare the case with the applicable official description.
Write down the category match
Copy the relevant category wording into your private review notes, together with the document title and version or date. Beneath it, explain how your proposed case meets each stated element.
Use specific descriptions. Replace “appropriate anterior case” with the tooth identifiers, treatment performed, and category language you are relying on. Distinguish your interpretation from the wording in the official materials.
Check these points:
- Identify the exact category you intend to use.
- Match each stated category condition to a record or explanation.
- Mark any condition whose interpretation remains uncertain.
- Seek clarification before treating an assumption as settled.
If your explanation needs an exception, record the exception and the authoritative clarification you need. Leave that item unresolved until you have an answer.
Select for a reviewable record
Before committing to the submission, inventory the records already available. Compare them with the applicable requirements rather than a remembered list from an earlier study session.
Identify any missing baseline image, unclear treatment detail, or unavailable record. For each gap, write whether you can resolve it appropriately and what evidence would close it.
Avoid choosing between cases solely by the most attractive final photograph. Compare how clearly you can explain the category match and document the treatment.
If you are considering several cases, give each a separate folder and concern list. Select the case only after completing the same review for every candidate.
Inspect margins and tissue evidence as separate questions
For the margin portion of your case audit, keep the restoration boundary and the surrounding tissue on separate review lines. Record what you can see without assigning a diagnosis from the photograph alone.
Describe the margin concern precisely
Inspect each submitted view for the area you want assessed. When you notice an apparent discrepancy, identify its location and describe its appearance in neutral language.
For example, write “dark line visible at the distal boundary in the close-up” rather than declaring that the restoration has failed. Then identify the clinical assessment or additional evidence needed to interpret that observation.
Use the same discipline for a suspected step, gap, excess material, or uneven transition. Keep the observation separate from its possible explanation.
Ask yourself:
- Can I identify the boundary clearly in the intended image?
- Have I recorded the tooth, surface, and location?
- Does the concern appear in another suitable view?
- What question should the reviewing clinician answer?
Leave decisions about adjustment, repair, replacement, or other treatment to the appropriate clinical assessment. Do not use this editorial checklist to select an intervention.
Review the surrounding tissue on its own terms
Inspect the tissue visible around the restoration and record any area you want professionally reviewed. Describe the appearance and location without inventing a cause.
Keep the timing of each photograph beside the observation. If photographs come from different appointments, preserve that distinction in your notes.
Where an area is obscured, label it “not assessable in this image.” Do not convert missing visibility into a favorable finding.
Close this part of the audit by stating what remains unresolved. Request a specific assessment or record, such as clarification of the visible boundary at a named surface, rather than a general reassurance that everything looks acceptable.
Trace contours and line angles across matching views
When reviewing contours and line angles, make the comparison explicit. Choose the tooth, surface, and reference relationship before deciding whether something needs closer assessment.
Follow the visible transitions
Trace the transitions between tooth surfaces as you inspect the line angles. Compare the mesial and distal sides, then examine their relationship to the neighboring teeth.
Use paired views with comparable framing where available. Keep perspective differences on your uncertainty list rather than immediately treating them as differences in the restoration.
Write observations that another reviewer could locate. “Check the distal facial transition near the incisal third” gives the review a defined target. “The shape looks wrong” leaves the target open.
For a suspected mismatch, record whether you are comparing:
- The restoration with an adjacent tooth.
- Corresponding teeth on opposite sides.
- Different views of the same restoration.
- The treatment plan with the documented result.
Keep those comparisons separate. Use the one relevant to the concern you are investigating.
Assess the whole contour before judging one detail
Continue the shape review beyond a single line angle. Inspect the visible facial contour, cervical transition, incisal outline, and relationship to adjacent teeth.
For suspected over-contouring, identify the exact area that prompted the concern. Request professional assessment rather than prescribing material removal from an image.
Compare the full view with the close-up. Note any feature that appears concerning in one view but remains unclear in another.
For a hypothetical example, suppose one close-up makes a distal transition appear unusually broad. Record that observation, check the available comparison views, and ask whether the concern reflects the restoration, the image, or both.
Finish with a location and a question. Request assessment of the distal contour of a named tooth rather than leaving the instruction at “improve symmetry.”
Review color and surface detail without changing the question
For the color portion of your submission review, specify which visual relationship you are assessing. Keep color, surface texture, and overall shape in separate notes.
Compare like with like
Choose the images you intend to compare and record their dates and capture conditions where known. Avoid settling a color concern through photographs with unexplained differences in lighting or processing.
When something appears mismatched, describe the observation. Use wording such as “appears lighter than the adjacent tooth in this view” and identify the photograph.
Ask for review of the specific area and relationship. Avoid turning “the shade seems off” into a treatment instruction.
If the available images do not support a useful comparison, mark the question unresolved. Plan any replacement photography according to the applicable submission rules and your clinical judgment.
Keep patient preferences and treatment goals in the case notes where relevant. Ask how the documented result relates to those goals without presenting personal taste as an official assessment criterion.
Inspect texture and reflective details separately
Review visible surface texture, gloss, incisal detail, and transitions between restored and neighboring surfaces. Give each concern a location.
For an area dominated by reflection or obscured by image conditions, record the visibility problem before judging the underlying surface. Request another appropriate view when needed.
Do not introduce an arbitrary numerical tolerance or a universal ideal for appearance. Use the applicable criteria and the clinical context for the individual case.
Close the section with a concrete instruction: identify the tooth, name the feature, and state which comparison or professional assessment would resolve your question.
Assemble photographs that answer the review questions
Build the photographic portion of your AACD case audit from the applicable submission requirements. Keep your working collection separate from the files you intend to submit.
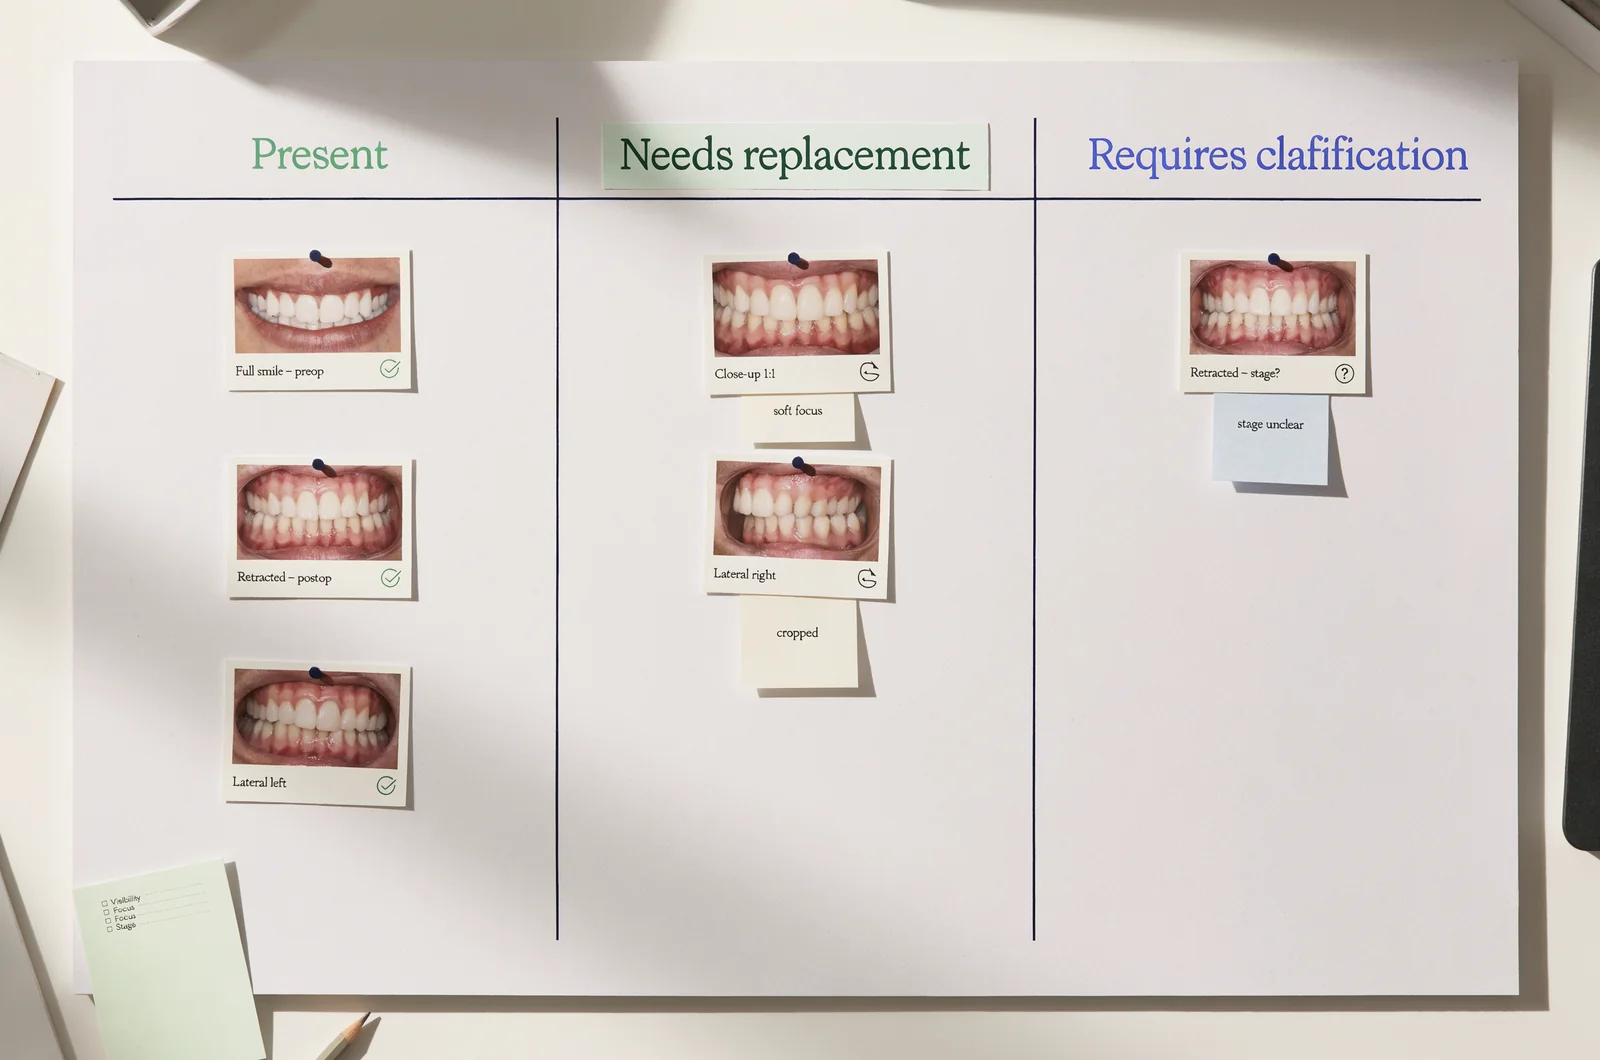
Check completeness against the official list
Create a private inventory using the required views and records in the applicable materials. For each entry, identify the corresponding file and confirm that it belongs to the correct case and treatment stage.
Do not supply missing requirements from memory. Where instructions are unclear, write the question beside the relevant item and seek an authoritative answer.
Review each selected image for the following:
- Visibility of the intended tooth, surface, or tissue area.
- Focus and framing sufficient for the review question.
- Correct identification of the treatment stage.
- Consistency with the written case account.
- Compliance with applicable image-handling requirements.
Use “present,” “needs replacement,” or “requires clarification” in your working inventory. Keep “present” separate from any judgment about clinical acceptability.
For any replacement, state the reason. Write “distal boundary not visible” rather than “better photo needed.”
Inspect the final files in submission order
Open the actual files selected for submission. Review their order, orientation, labeling, and relationship to the case narrative.
Compare before-and-after selections without assuming matching filenames mean matching views. Check the tooth identifiers and treatment stages yourself.
Preserve the original files. Follow the applicable rules for processing, cropping, labeling, and any other permitted changes. Do not alter a visible clinical feature to resolve an audit concern.
Check privacy and authorization requirements against the rules that apply to your records and submission. Keep identifying information only where those requirements permit it.
Finally, inspect the exported or uploaded version if the submission process provides a preview. Confirm that every intended file remains readable and appears in the correct place. Record the filename of any item that still needs attention.
Match the written account to the submitted records
For the written portion of your clinical case review, make each statement traceable to the relevant record. Use the document types requested by the applicable submission instructions.
Explain the treatment choices you actually made
Where a written account is required, describe the presenting situation, treatment goals, decisions, and documented result within the requested scope.
Use precise tooth identifiers and consistent terminology. Replace broad praise such as “excellent esthetics” with a description of the result you want the reviewer to assess.
Separate the original plan from any later change. Explain the documented reason for the change without reconstructing a more convenient history.
Review the account for statements that overreach the evidence. If you describe a feature that the submitted images do not show, identify the appropriate supporting record or revise the wording.
Keep unresolved clinical questions visible in your private audit notes. Do not rewrite uncertainty as certainty merely to make the account sound more polished.
Reconcile dates, identifiers, and study notes
Check the chronology against the records. Confirm which images belong to the initial presentation, treatment stages, and final documentation.
Use the same tooth-numbering convention throughout. Where another convention appears in an original record, clarify the correspondence rather than silently changing the meaning.
Keep examination study notes separate from the patient case account. For an ExamJungle study session, set a learning objective such as reviewing terminology or explaining a concept in your own words.
Return to the case record for statements about the treatment you performed. Verify each substantive sentence against the appropriate evidence, and flag any sentence that still needs confirmation.
Turn each concern into a specific review action
Complete the audit by deciding what to do with each unresolved item. Use a proposed decision process rather than inventing an AACD scoring system.
Give every concern a clear disposition
I’d use one short sequence for the review:
- Record the observation and its exact location.
- Identify the criterion or clinical question involved.
- Assign the appropriate clarification, assessment, or documentation task.
- Recheck the item against the resulting evidence.
For a documentation issue, name the missing or unclear record. For a clinical concern, request assessment by the appropriate clinician. For a category question, identify the official wording that needs clarification.
Avoid vague dispositions such as “monitor,” “looks fine,” or “probably acceptable” unless the relevant professional assessment gives them a defined meaning.
If a concern remains unresolved, leave it open. Decide whether to delay the submission or consider another case through the applicable process and professional judgment.
Make a second review easy to follow
If you seek another clinician’s review, provide the applicable criteria, selected records, and specific questions. Ask for observations that identify the tooth, surface, image, or passage involved.
Keep your original observations alongside the response. Record what changed and why you consider the question resolved.
A useful interactive checklist could let you attach a filename to each concern and assign “clarify,” “clinical review,” or “replace documentation.” Have it show unresolved items without generating a predicted accreditation score.
After any change, revisit the affected images and written passages. If you replace a photograph, check the narrative reference. If the case account changes, check its consistency with the records.
Finish by reopening every item marked resolved. Confirm that the supporting record is actually in the final submission set, rather than elsewhere in your working folder.
Resolve the questions that can stall a submission
Before packaging the case, answer the questions still left in your audit notes. Keep the answer tied to the relevant criterion, record, or professional assessment.
Does a visible discrepancy mean automatic failure?
Do not assign an automatic failure from this checklist. Locate the applicable assessment language and obtain an authoritative interpretation where necessary.
Describe what you observed before attaching a judgment. For an apparent margin or contour concern, include the location and the evidence available for assessment.
Record the answer beside the original question. Keep its source identifiable in your private notes.
Should I change the restoration or retake the photograph?
Begin by identifying what remains uncertain. Request professional clinical assessment for a possible treatment issue and assess image adequacy against the applicable documentation requirements.
Do not choose a clinical intervention solely to improve the appearance of a submission photograph. Keep any treatment decision within the patient’s clinical care.
After the appropriate assessment, document the resulting decision and revisit the affected submission records.
Can written-exam practice count as clinical case readiness?
Track written preparation and clinical submission review separately. Give each its own evidence and completion criteria.
If you use ExamJungle alongside your AACD preparation, keep questions from study sessions in a learning notebook. Transfer a question into the case audit only when it concerns the case you intend to submit.
Verify that question against the relevant official material or professional assessment before closing it.
What should I check immediately before packaging?
Review the category match, unresolved concerns, selected files, and written account one final time. Compare the package with the applicable submission instructions.
Then open the final version in its intended order. Confirm each required item, remove unintended working files where appropriate, and leave any unresolved requirement clearly identified for action before submission.
Build your AACD written study plan